Self-hosting is a convenient skill to have for anyone: it allows you set up personal VPNs, cloud services, and more. As a developer, I find they’re useful for cheaply serving my web app projects over the internet. I’ll be sharing my workflow for serving web applications in this post.
Setting up the Host Machine
We first choose our host machine: a computer that we want to use as our server. An easy choice to start off with is a Raspberry Pi, which is a single-board basic personal computer.
Another option is to use any old unused hardware you have, such as laptops or desktops. This is a good way to avoid letting those devices become e-waste by repurposing them. I recommend installing a Linux disto, such as Ubuntu server since it is lightweight. For sufficiently outdated hardware, there may be some troubleshooting needed to get a Linux distro working properly. I documented some troubles I had while installing Linux on 2 old laptops of mine in this post
Running the Web Application in Docker
Docker is a tool that provides OS-level virtualization in containers. We use this to create lightweight containers for running web servers in a safe, isolated environment.
- Install Docker and Docker compose with
sudo apt install docker.io docker-compose - Run
systemctl status dockerto ensure Docker is running; otherwise runsudo systemctl enable --now docker - Create a
docker-compose.ymlin the project folder that runs the app.
The following docker-compose.yml example is used to run a Flask app.
For practice, you can follow along with my procedure.
| |
The Flask app starts a web server on port 8080.
This configuration pulls a Python3 Docker image from dockerhub and forwards
requests targeting port 80 on the host machine to port 8080 inside the container.
When executing docker-compose up -d in project folder, a docker container will be created
and the command to install the Python dependencies listed in requirements.txt and serve the Flask app will be run.
Once the app is running in a container, test if you’re able to make requests to the app.
In our example, we can try curl http://localhost on the host machine to fetch the index page of the app.
For more debugging information run docker ps to check the status of running containers
and docker logs <container_id> to check logs within a container.
More about the docker CLI can be found in this cheat sheet.
Serving over the Internet
At this point, computers in your local network are able to access the web app. You can test this by doing the following:
- Get the IPv4 address of your host machine.
- In another computer, enter
http://<IPv4>into the browser.
If there aren’t any problems, then the index page for the app should have shown up. However, this would not work with any computers outside your network yet. For that, we need to port forward port 80 on your router to the app.
To do this, access your router’s settings page from a browser. If you do not remember the URL of your gateway router, you can check with the following command:
| |
In my case, it was http://192.168.1.254.
Once you log in to your router, you should look for wherever the port forwarding
table is located and add an entry with source HTTP port 80, destination port 80,
and the IP of your host machine.
If all previous steps were done correctly, requests to your home’s WAN address will reach the web app. Your WAN address should appear in the router’s settings page, but you can also check this online.
Setting up a Domain Name
At this stage, it is possible to access the web app from anywhere by entering your home’s WAN address into the browser, but there are 2 issues:
- Anyone who wants to use the app will know your home’s IP.
- The URL for the app isn’t easily human-readable.
We can start off by fixing the second point first by registering a domain name.
When a client/browser makes HTTP requests with a domain, such as https://devtools.joeyshi.xyz,
it first must do a lookup to find the IP address associated with that domain name.
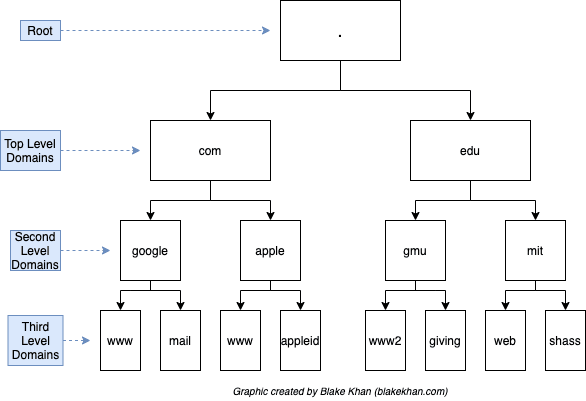
DNS (Domain Name System) is a distributed database implemented as a hierarchy of many name servers. This can be thought as a search tree where each node holds records of IP addresses (A records) or references to other name servers (NS records). The list of DNS resource record types can be found in this RFC for DNS.
To have a domain name point to our host machine’s IP address, we need to purchase a domain name from a DNS registrar. I personally use Namecheap.
In the DNS settings of your chosen registrar,
we can simply add an A record whose value is your WAN address.
Namecheap has a more detailed guide here.
It normally takes a few minutes before new records take effect.
To check if the records are active, run dig <domain_name> to do a DNS lookup and try entering http://<domain_name> into the browser
to do a full test to ensure everything previous is working correctly.
Hiding your IP Address with Cloudflare
Although having a domain name hides your IP address from the browser search bar, it is still very much exposed. Anyone can still do a DNS lookup on the domain to find it. To resolve this issue, we will be using Cloudflare’s DNS proxy feature to hide the IP.
A proxied record in Cloudflare is a record for which the requests with the associated domain name will go through Cloudflare first before reaching your host machine. From the outside, doing a DNS look up on a proxied record will return one of Cloudflare’s IP, so your IP will be hidden from people visiting your website.
Here is a detailed guide for registering your DNS records under Cloudflare.
Remarks
If you made it this far, you have successfully self-hosted an app at home. Improvements can be made from this point, such as setting up HTTPS, a firewall, and reverse-proxy. If you’re interested about other services you can host at home, take a look at Luke Smith’s landchad.net. Feel free to explore and adapt these steps to your specific needs. Happy hosting!